A 500 year-old mystery solved! Here we demonstrate precisely how the anamorphic projection in Hans Holbein’s painting The Ambassadors was made.
NOTES & REFERENCES
Intro Sequence (0:00-0:21)
Opening music: “Prospero’s Magic” by Michael Nyman, from the soundtrack to Peter Greenaway’s film Prospero’s Books.
(0:01) KIRCHER, Athanasius. Mundus subterraneus, Janssonius & Weyerstraten, Amsterdam, 1665, Tome 1, p. 233. Digitized photographic reproduction provided by the Herzog August Bibliothek, Wolfenbüttel, Germany.
(0:03) The same image, embellished lovingly with colored pencil.
Hans Holbein’s Hands
In the previous episode, I decided to give myself the challenge of finding 3 new images for each episode’s “intra-cave flyby”. For this episode, it would have made perfect sense to have used close-ups of the various objects depicted in The Ambassadors. But since that painting is the explicit topic of the episode, somehow it all seemed like cheating. So the new challenge became to find 3 interesting images from Holbein paintings without using anything from the Ambassadors. And then, just to make everything even more unnecessarily difficult for myself, I decided the theme should be “hands”. Anyways, in the end, I think I found a pretty excellent trio, wouldn’t you agree?
(0:07) HOLBEIN, Hans (the younger). Detail from the Portrait of the Astronomer Nikolaus Kratzer, 1528, tempera on wood, Musée du Louvre, Paris, France. Image downloaded from zeno.org, 15-mar-2012. The object in Kratzer’s hands is a polyhedral dial, which is a fancy type of sundial meant more to show-off the skill of its maker than as a functional way to tell the time.
(0:09) HOLBEIN, Hans (the younger). Detail from the Portrait of Robert Cheseman, 1533, tempera on wood, Mauritshuis, The Hague, the Netherlands. Image downloaded from wikimedia commons, 15-mar-2012.
(0:10) HOLBEIN, Hans (the younger). Detail from the Portrait of Desiderius Erasmus, 1523, oil on wood, The National Gallery, London, UK. Image downloaded from wikimedia commons, 15-mar-2012. This is one of three portraits of Erasmus painted by Holbein. The book’s pages are stamped with the words ΗΡΑΚΛΕΙΟΙ ΠΟΝΟΙ (“Herculean Labors”) which references Erasmus’ scholarly labors in general, and his Adagia in particular. But these are not mere words–no, what I absolutely love about this portrait is that you can see how Erasmus’ nails are stained with ink. Alas, no amount of typing can ever reward the modern scholar with an equivalently glorious badge.
The World is Full of Hidden Wonders (0:22-0:50)
The world is indeed full of hidden wonders, one of them being how I have now twice in a row selected episode topics expressly because I thought they would be “easy” and “no way as hard as the last time” only to find myself 5 months-in feverishly working on a “hobby” that has metastasized beyond all limits of sanity. Believe it or not, I had originally planned only to mention The Ambassadors in passing. Hah! This turned out to be a rabbit hole from which I only barely managed to extricate myself.
(0:30) HOLBEIN, Hans (the younger). The Ambassadors, 1533, oil on oak, The National Gallery, London, UK. Image downloaded from wikimedia commons, 5-jan-2012. This image, which is 1084 x 1069 pixels, was the input for my various computer programs; it’s large enough to still look decent after being distorted but not so large that the computations become unreasonably slow. However, the resolution isn’t high enough to actually examine the painting in any depth. Amazingly, though, only several months before I got it into my head to work on this episode, Google Art Project produced a giga-pixel digitization of the painting that provides just a beathtaking level of detail. I had the opportunity to view the actual painting in London back in 2002 but, what with all the museum-goers and guards, how long can you actually stare at the painting? A minute, 2 minutes tops before people start to think you’re a sociopath? But thanks to Google, I was able to spend hours hunting for clues in the painting and still not ruin anyone’s day at the museum (well, at least none that I’m aware of).
(0:36-0:42) This animation is the output of a MATLAB code I wrote called anamorphic.m, which I will discuss at the appropriate spot, below. It emulates how the painting would actually look as you walked around it, keeping a constant radius between your eye and a given spot on the painting.
(0:43-0:48) iMovie doesn’t allow you to zoom-in that far so I had to use MATLAB to animate this sequence as well.
Etymology (0:51-1:12)
It’s true that my wording here is somewhat imprecise in that “anamorphosis” doesn’t come from a Greek word, it is a Greek word (ἀναμόρφωσις). But I didn’t want to say “it’s a Greek word that means the process of forming-again.” That seemed clunky even to me. But this isn’t to say that it’s an especially common Greek word. According to Liddell and Scott, its attestations appear limited to the Imagines of Philostratus Junior and the Suda, under the entry for a different word, καινουργισμός.
With regards to pronunciation, the Oxford English Dictionary says, “Still by some pronounced anamorphōsis, after the Greek ω. Compare metamorphosis”. Still by some! Well, sorry, I guess I didn’t get the memo. Sheesh.
These Sorts of Illusions (1:13-1:28)
Amongst the sources I turned to when researching the history of anamorphic projections, it seemed that far and away the very best was:
BALTRUŠIATIS, Jurgis. Anamorphic Art. Trans. W.J. Strachan. Harry N. Abrams, Inc., New York, 1977. (Originally published in French as Anamorphoses, ou perspectives curieuses, Olivier Perrin Éditeur, Paris, 1955.)
Another excellent book, which has the advantage of having color pictures, is
LEEMAN, Fred, ELFFERS, Joost, and SCHUYT, Mike. Hidden Images: Games of Perception, Anamorphic Art, Illusion, From the Renaissance to the Present. Trans. E. Childs and M. Kaplan. Harry N. Abrams, Inc., New York, 1976. (Originally published in German as Anamorphosen: Ein Spiel mit der Wahrnemung, dem Schein und der Wirklichkeit, Dumont, Schauberg, 1975.)
(1:13) SCHÖN, Erhard. Vexierbild (“Puzzle-Picture”), woodcut, 1st half of 16th Century. Kupferstichkabinett, Staatliche Museen zu Berlin. Image downloaded from zeno.org, 17-apr-2012.
(1:17) SCROTS, William. Anamorphic Portrait of Edward VI, oil on panel, 1546. National Portrait Gallery, London, UK. Image downloaded 17-apr-2012.
For both of the above images, the accompanying distortions (where the images appear un-distorted) were made by me using the perspective-tool in the GIMP. I suspect that many of the reconstructions of the anamorphic skull in The Ambassadors found in books and on the internet have been made by the same method. Basically, various graphics programs (for example, the GIMP) provide a tool that allows you to distort an image by moving the four corners individually. Thus, you can just stretch/squash the corners until the underlying image looks reasonable and, voilà, instant anamorphosis! In theory, one could then take the resulting transformation-matrix and work backwards to obtain a viewpoint/angle, but this is the opposite approach to what I used to analyze The Ambassadors. As I will explain, below, my computer program generates a transformation for a given viewpoint, and then generates the image as it would be seen from that viewpoint.
(1:23) HOLBEIN, Hans (the younger). The Ambassadors, op. cit. supra.
A Totally New Finding (1:29-1:49)
To the best of my knowledge, no one has proposed anything remotely similar to my result. I will, inshallah, try my best to get my research published in a semi-respectable journal of some sort. Although, as I’ve suggested elsewhere, I believe the rambling, hyperlinked format I’ve adopted here at Idols of the Cave is a superior way to convey scholarship than a traditional journal (a rather odd sentiment, I just realized, to come from such a hopeless antiquarian). And this is all the more true when the topic is, as here, expressly visual. Moreover, inasmuch as academic journals serve rather to facilitate professional advancement, even at the expense of reaching a smaller audience, it’s not entirely clear that such an exercise would have any benefit for someone who’s strayed as far off the academic reservation as I have. But should any developments on this front arise, you can be certain I will mention them here.
The only other work I’ve found that at least proposes a “correct” viewing location (with specific measurements given in millimeters) also happens to be the best and most authoritative book about The Ambassadors and I suppose here is as good a place as any to reference it:
FOISTER, Susan, ROY, Ashok, and WYLD, Martin. Holbein’s Ambassadors. National Gallery Publications, London, distributed by Yale University Press, 1997. Published as part of the “Making and Meaning” series and to accompany an exhibition at the National Gallery, London, 5-nov-1997 to 1-feb-1998.
Additionally, a companion-video was made to accompany the exhibit:
STURGIS, Alexander, and FOISTER, Susan. Holbein’s Ambassadors (videocassette). Produced by the National Gallery Audio Visual Unit and distributed by Home Vision Arts, 1997, 30 mins. I actually managed to get my hands on both the video and a VHS player (which isn’t trivial these days). The video is quite excellent, and a few little snippets can be found on youtube.
The other absolutely indispensable book about the painting is:
HERVEY, Mary F. S. Holbein’s “Ambassadors”: The Picture and the Men: An Historical Study, George Bell and Sons, York Street, Covent Garden, London, 1900. Digitization of the complete text is made available by Google Books.
Before Hervey’s scholarship, very little was known about the painting, including the identity of the two subjects. Seemingly the only thing that had never been in dispute was its attribution to Holbein since “IOANNES HOLBEIN PINGEBAT 1533” can be read at the bottom-left of the painting. Or, rather, this can be read in principle. The text is, in fact, impossible to see even in the ultra-high resolution image at Google Art Project. It’s located on the pavement in the dark region underneath the bottom, leftmost fringe of ermine in Jean de Dintville’s robe. The signature can, however, be seen in a detail in FOISTER et al., op. cit. supra, p. 11.
Although “The Ambassadors” has been the focus of a great deal of (oftentimes unhinged) speculation, there has been very little of substance to add to Hervey’s account from over a century ago. (Might our contribution rise to the occasion? We must let others be the judge of that.) Accordingly, it should not detract from the rest of her excellent book that her one sentence on the technical aspects of the anamorphosis in the painting is entirely without merit. She writes,
“But the most striking feature of all this remarkable mise-en-scène is a large oval object placed slanting-wise in the very centre of the foreground. Close examination reveals this to be a skull, or Death’s-head, distorted by reflection in a curved mirror.” HERVEY, op. cit. supra, p. 203
My take is that this assertion, which seems to have been made almost in passing, is not the result of any sort of deductive reasoning, but stems rather from a confusion with another, popular variety of anamorphic projection. But, for what it’s worth, a segment of the video by STURGIS et al. is apportioned to showing why this claim cannot be correct.
A Little Computer Program (1:50-2:10)
For those unfamiliar with the usage, a “little computer program” translates to, approximately, 4 months of manic anguish, or roughly 1,000 hours of fevered typing, scrawling, calculating, gnawing and cursing.
(1:56) As mentioned, all my programs were made with MATLAB and I would like to take this opportunity to state, for the record, that I will in no way think less of the developers should they wish to send me free stuff in return for promoting their product.
Generating all the animations and various still-images necessitated several dozen scripts, but in regard to our analysis there are really 2 main programs. The first, anamorphic.m, transforms an image to show how it would appear from a specific viewing position. The second, inverseTrapezoid.m, transforms an image according to the “inverse trapezoid” transformation that we introduce later on. At this point in our story we are describing only anamorphic.m. The premise of the program is straightforward enough:
STEP 1: An image-file is (generally) an m x n x 3 array, where 3 color values (red, green and blue) are stored at each of the m x n pixel-locations. The image of The Ambassadors that we used is 1084 x 1069 pixels; it can be imported into MATLAB using the imread command whereupon the data will be stored as a 1069 x 1084 x 3 array. Note the different row/column conventions: an image is described as so-many-pixels wide by so-many-pixels tall whereas a standard, mathematical array is described as so-many rows by so-many columns.
The array is 3-dimensional or, equivalently, it can be thought of as 3 separate 2 x 2 arrays: a red array, a green array and a blue array. The m x n elements in each these three, 2-dimensional arrays are 8-bit unsigned integers which means their values are integers ranging between 0 and 255.
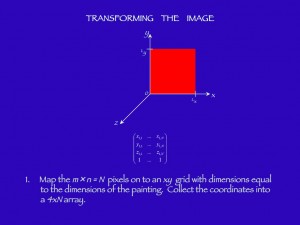
The three, 2-dimensional arrays store indexed color-values (red, green or blue), but those indices are also a coordinate-map of pixel-locations. Our anamorphic projection will entail mapping this initial, square coordinate-grid onto a new, distorted coordinate-grid. For what follows next, we are only interested in the coordinate information of our arrays (and not the color information).
A proper coordinate-map will consist of two m x n arrays, the first of which contains the x-coordinate of each pixel and the second of which contains the y-coordinate of each pixel. Initially this is just the column-index and row-index of each pixel. However, because in a standard 2-dimensional matrix the coordinate (1,1) indexes the upper-leftmost element, we need to vertically flip our image. This is accomplished using the flipud command. After this operation, (1,1) will index the lower-leftmost pixel and (1084,1069) will index the upper right-most pixel, thus allowing the indices of our arrays to serve as an xy-coordinate grid.
Next, we want to transform our initial coordinate grid (which is just the column and row indices of the arrays) to a coordinate grid that corresponds to the physical dimensions of the painting. Naturally, we desire these measurement to be as precise and accurate as possible since these values will affect everything that follows. We regard the most authoritative measurements to be 2095 x 2070 mm, as reported in:
WYLD, Martin. “The Restoration History of Holbein’s Ambassadors,” National Gallery Technical Bulletin, Volume 19, 1998.
The new xy-coordinate grid is made using the meshgrid and linspace commands. The x-values are 1084 evenly-spaced points ranging from 0 to 2095 (the physical width of the painting in millimeters) and the y-values are 1069 evenly-spaced points ranging from 0 to 2070 (the physical height of the painting in millimeters). Accordingly, in this new coordinate grid, the lower-leftmost pixel has coordinates (0,0) and the upper-rightmost pixel has coordinates (2095,2070).
At this point, the x-coordinates of every pixel are stored in an array with m x n = N elements, and the y-coordinates of every pixel are stored in a separate array that also has m x n = N elements. These two arrays are now reshaped into two, 1 x N arrays. This action should (hopefully) remove any lingering confusion between coordinates of the pixels and the image they represent because now the coordinates are no longer stored in an array with the same dimensions as the image.
These two 1 x N arrays are concatenated, resulting in a 2 x N array of xy coordinates. The initial z-coordinates of each of the pixels is taken to be 0, and these values are inserted as a third row resulting in a 3 x N array of xyz coordinates. Lastly, the coordinate array is augmented by a row of 1’s whose sole purpose is to allow coordinate-translations to be performed via matrix multiplication (equivalently to a rotation). The resulting array is 4 x N.
STEP 2:
The next step is to construct a transformation matrix that, when multiplied with our 4 x N array (which contains the xyz positions of each pixel in the old coordinate system), will produce a 4 x N array of data containing the xyz positions of each pixel in the new coordinate system.
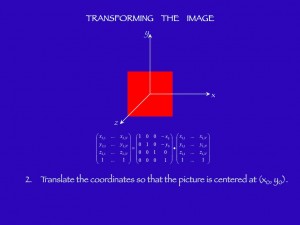
The transformation matrix is composed of several parts corresponding to the several operations we wish to perform. The first operation is a simple coordinate translation: We wish to translate the entire picture so that the origin of the coordinates (0,0) is not located at the lower-lefthand corner of the image, but at some other point which we designate (x0,y0). Where the origin should be placed is, of course, one of the main things we need to determine. But for the purposes of this code, x0 and y0 are simply input-parameters that can take-on whatever value we wish. The resulting translation matrix will have the form shown in the diagram, above.
STEP 3:
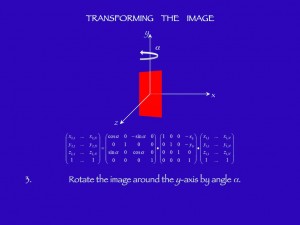
The next operation is a rotation about the y-axis by an angle α. Recall that, as a consequence of step 2, the location of the y-axis is now a distance x0 from the leftmost edge of the image. For a clockwise rotation (as seen from above), the rotation matrix will have the form shown in diagram.
STEP 4:
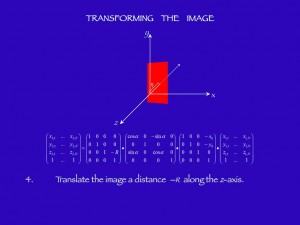
The next step is to translate the entire image a distance –R along the z-axis. The construction here is for the viewer’s eye to be located at the origin (0,0,0) of our coordinate system and for the viewer to be looking directly at a point on the painting whose coordinates are (0,0,-R). And recall, once again, that (0,0) corresponds to a point located a distance x0 from the lefthand edge of the painting and a distance y0 above the bottom edge of the painting. The reason that the painting is translated by -R and not by R is to ensure that our xyz coordinate system is right-handed. The explicit form of this translation matrix is provided in the diagram, above.
STEP 4b:
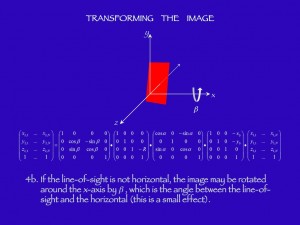
For the sake of completeness, we may perform an additional rotation about the x-axis by an angle β. The purpose of this is to emulate how an image would appear if the line-of-sight is not horizontal. For example, say that our eye is situated half-way up the painting, but that we focus our gaze on a spot near the bottom of the painting. The effect of this is that the vertical edge of the painting closest to the viewer’s eye (here, the rightmost edge) will appear not straight but slightly oblique. β is not an input in anamorphic.m; rather the user specifies the height of the viewer’s eye (yEye) and the height of the eye’s focus (yFocus) and β is then determined from the relation β = arctan((yEye – yFocus)/R).
Inasmuch as the general museum-goer is prohibited from viewing the painting from particularly extreme angles (say, for instance, by hanging upside-down from the ceiling), β must necessarily be fairly small and the effect of including this rotation tends to be negligible. In fact, since our ultimate conclusion is that the anamorphic projection was made with a geometrical construction (as opposed to a physical one) the correct value of β to use is, in fact, zero. However, as mentioned, I have included this step lest anyone complain that my analysis was somehow not sufficiently thorough.
STEP 5:
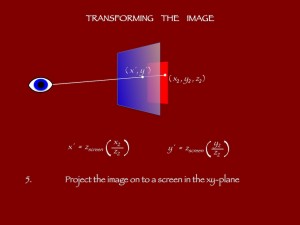
The final step of the mathematical transformation of the image is to project it onto a fictitious screen in front of the viewer’s eye. In accordance with the assumptions of classical perspective, this fictitious screen represents the eye’s flat, 2-dimensional field of vision. The projection of arbitrary points onto a screen may seem like a tricky geometrical problem at first, but all of the points of interest lie on similar triangles so the resulting formulae are quite simple.
The fictitious screen is placed in the xy-plane at a distance zscreen from the viewer’s eye. In accordance with our construction, where the eye is located at the origin of our coordinate system (0,0,0), both the painting and the screen will have z-coordinates that are negative. Then, for every point (x2,y2,z2) on our (rotated and translated) image, we wish to find the projection (x‘,y‘) on the screen which is collinear with the eye and (x2,y2,z2).
The actual value of zscreen, that is the distance between the eye and the screen along the z-axis, is entirely meaningless. This value serves only as a magnification factor for the final image, making it appear larger or smaller in proportion to how close the screen is placed to the painting. It was the source of some headache when generating the animations, since we had to take care to choose a value for zscreen that would make sense for every viewing angle, but in general we chose zscreen to be located at the z-coordinate of whatever point of the painting was closest to the eye (i.e., whichever point had the largest z-value). This choice meant the resulting projection would be as large as possible without suffering from any of the pathologies caused by having points of the painting in front of the screen (an important consideration).
So much for our description of the mathematical transformation of the image. Computationally, the transformation can, up to this point, be effected quite simply. At this stage, as mentioned earlier, we had collected the initial xyz-coordinates of all of our N pixels into a 4 x N array. The first row of the array contains the x-coordinates, the second row the y-coordinates, the 3rd row the z-coordinates (all o’s), and the fourth row is just a row of 1’s (required if we want to perform coordinate translations via matrix multiplication).
Following the notation of our program anamorphic.m, the 4 x N array of initial coordinates is called P1. Each of the mathematical operations of our coordinate-transformation will be expressed as 4 x 4 matrices as shown in the various diagrams, above. Since MATLAB is a language designed expressly for matrix manipulations, the entire transformation is effected with one line of code:
P = Rx(beta)*Tz*Ry(alpha)*Txy*P1;
Here P1 is the array of old coordinates and P is the array of new coordinates. Rx and Ry are the rotation matrices about the x and y axes, respectively, which take as arguments the angles beta and alpha. Tz and Txy are the translation matrices along the z and xy axes, respectively.
The projection of the image is likewise easily accomplished. The new x and y coordinates (stored in arrays x2 and y2, respectively) are computed with just one line of code:
x2 = zscreen*(P(1,:)./P(3,:));
y2 = zscreen*(P(2,:)./P(3,:));
Conceptually we have finished what we set out to do: We have transformed the coordinates of the initial image to a set of new coordinates. Unfortunately, converting these new coordinates into an image file is somewhat tricky. This is because we need to associate our new xy-coordinates with row/column addresses in an array.
The first step is to make two new meshgrids (called X2 and Y2) that will cover the space occupied by our transformed image. These two arrays are just 2-dimensional matrices of evenly spaced points between min(x2) and max(x2) and min(y2) and max(y2). The commands floor and ceil are used to make the extreme points of the grid nice, round integers.
The spacing of the grid is set by a user-input called, appropriately enough, resolution. The default memory limit in MATLAB is 50 MB and, of course, it’s very easy to run up into that limit using large, 2-dimensional arrays of double-precision numbers. I’ve never been particularly adept in the art of making my algorithms efficient since I generally don’t write memory-intensive code. So it’s possible that everything that follows might very well be the least sensible way of performing the task-at-hand. That being said, the best resolution I could achieve (which was plenty fine) in my code anamorphic.m was 0.2 mm. Since the original image has a resolution of only about 2 mm, there’s probably no further visual information that could be squeezed out of the image anyways.
So, the basic problem is that we want to map our image (N points whose coordinates are stored in the arrays x2 and y2) onto our nice, evenly-spaced meshgrid X2 and Y2. For each point of the meshgrid, we will need to interpolate the red, green and blue values for the new pixel. The first step is to reshape the original red, green and blue arrays (m x n arrays of 8-bit integers) into 1 x N arrays that match-up in sequence with their new coordinates x2 and y2. We name these three arrays red1, green1 and blue1.
Conceptually our task is simple: All we need to do is to interpolate the values of red1 (and green1 and blue1), whose points have coordinates x2 and y2, at the locations of the evenly-spaced mesh coordinates X2 and Y2. The problem is that MATLAB generally only interpolates between one meshgrid and another meshgrid. But our coordinates x2 and y2 are not evenly spaced and therefore cannot be made into a meshgrid. MATLAB does, however, provide a command which interpolates from a non-meshgrid onto a meshgrid: TriScatteredInterp.
TriScatteredInterp works great, although I wonder if using it is like cracking a nut with a sledgehammer. Since it employs a fairly-involved algorithm, it is time-intensive to run (in my case anywhere from a few seconds to a minute or so). I suspect that there must be more clever and, therefore, much faster solutions to our problem, but the truth is that although it is slow, it wasn’t slow enough to force me to think about finding an alternative.
Interpolation using TriScatteredInterp requires two steps. The first step produces an interpolant-map which must then be applied to a meshgrid. In our code, these steps look (more or less) as follows:
redMap = TriScatteredInterp(x2,y2,red1);
red2 = redMap(X2,Y2);
These steps would then be repeated for the green and blue values. Lastly, red2, green2 and blue2 need to be converted back to unsigned 8-bit integers in order for them to suitable output for an image-file.
At this point we are, essentially done. We can export red2, green2 and blue2 as an image-file of our choice (I generally stuck with jpegs). The final section of anamorphic.m is concerned with ensuring that the focus-point (x0,y0) will always occupy the same pixel so that if we make an animation that point will remain fixed, even as the rest of the image moves around.
(1:50-1:56) This animation, like the previous one that begins at 0:36, uses the code anamorphic.m inside of a loop. It takes several hours to make all the required still-images but, fortunately, once the loop is working correctly, you can just let it run overnight. The animation here has the added excitement that I display some of the transformation parameters in the upper-lefthand corner. Slightly confusingly, though, here y0 is the height of the viewer’s eye and yT is the height of the target-point on the painting. Generally, in my analysis, these two values would be the same (and therefore β would be zero). But in order to get the cool, falling-leaf effect that you see I had to rely on values of β that swing between rather large (and very unlikely) positive and negative values.
(2:07) Hello there! If you’re reading this you are evidently one of the very few people who decided to call my bluff and see whether or not I really did “put a full explanation of all my steps on my website.” Well, I’m working on it! Only another 6 minutes and 34 seconds of video left to annotate! (I think that means I’m half-way done, right?)
Hypothesis #1: The Room with 2 Doors (2:11-3:09)
(2:17) “One interpretation I read which I really liked…” The interpretation that the painting was meant to be hung in a room with two doors comes from Baltrušaitis:
“The Mystery of the Two Ambassadors is in two Acts. Act One is played when the spectator enters by the main door and finds himself a certain distance away from the two nobles, who appear at the back as on a stage. He is amazed by their stance, the display of luxury, the intense realism of the picture. He notes a single disturbing factor: the strange object at the ambassadors’ feet. Our visitor advances in order to have a closer look. The scene becomes even more realistic as he approaches, but the strange object becomes increasingly enigmatic. Disconcerted, he withdraws by the right-hand door, the only one open, and this is Act Two. As he enters the next room, he turns his head to throw a final glance at the picture, and everything becomes clear: the visual contraction causes the rest of the scene to disappear completely and the hidden figure to be revealed. Instead of human splendour, he sees a skull. The personages and all their scientific paraphernalia vanish, and in their place rises the symbol of the End. The play is over.“
BALTRUŠIATIS, op. cit. supra, pp. 104-5.
(2:25) “Illustration of the chateau of Polisy, from an original drawing of the early seventeenth century”, reproduced in HERVEY, op. cit. supra, p. 34.
(2:26) The same image, painstakingly colorized by me using the GIMP. These sorts of efforts are usually just a very time-consuming way for me to pretend I’m making progress when really I’m stuck on something else.
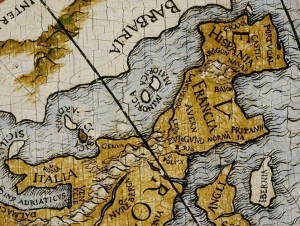
Interestingly, one of the clues establishing the identity of Jean de Dintville in the painting is the presence of his ancestral estate, Polisy, which hardly rises to the level of a village, on the terrestrial globe that barely has space to spell-out the names of countries.
Detail of The Ambassadors showing a portion of the terrestrial globe. Image captured from Google Art Project, 24-may-2012. Polisy (here spelled Policy) can be seen on the globe slightly southeast of Paris.
(2:29-2:39) Another animation made with MATLAB. Although I haven’t included a link to the code, it’s really just a series of 3-dimensional plots where the ‘Projection’ property of the axes is changed to ‘Perspective‘ from the default setting ‘Orthographic.’ I originally made this animation to illustrate the construction I used in my computer code anamorphic.m and it is still useful in that regard. From any aspect, how the painting appears to the viewer is found by projecting each point of the painting onto a fictitious screen that is perpendicular to a line drawn between the eye and the target-point of the painting (x0, y0). As the viewer walks around the painting, a constant distance is maintained between the eye and the target-point and a constant distance is maintained between the eye and the screen.
(2:40) BOXER, A. Anamorphic Reconstruction of the Skull in Hans Holbein’s Painting “The Ambassadors”, March, 2012.
(2:43) BRUYN, Bartholomäus (the elder). Vanitas Still-Life on the Reverse of the Portrait of Jane-Loyse Tissier. 1st half of 16th century. Oil on wood. Kröller-Müller Museum, Otterlo, the Netherlands. Image downloaded from zeno.org, 21-april-2012.
(2:47) CHAMPAIGNE, Philippe de. Vanité. 1644. Oil on panel. Musée de Tessé, Le Mans, France. Image downloaded from wikimedia commons, 21-april-2012. Modern devotees of the 17th century may recognize this painting from the cover of the New York Review Books Classics edition of Burton’s Anatomy of Melancholy.
(2:52) DÜRER, Albrecht. Underweysung der messung, Jeronymus Formschneyder, Nuremberg, 1528, p. 59 (foldout). Digitized photographic reproduction of the complete text provided by the National Library of the Czech Republic.
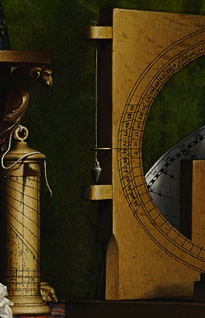
(3:03) “It’s easy to find eye-level for the portrait…” What I mean here is that it’s a straightforward task to find the vertical height of the vanishing point in the painting. Any horizontal surface that we can see ‘from above’, such as the surface of the table or the cover of the book, must be below the vanishing point. Conversely, any horizontal surface that we can see ‘from below’, such as the bottom surface of the brass, equatorial ring on the celestial globe, must be above the vanishing point. By this logic, the painting’s vanishing point must be very nearly level with a surface that we can neither see from above or below, such as, for instance, the metal eyelet around the plumb-line located just above the plumb-bob.
“Unfortunately, it turns out this is all wrong…” (3:10-3:42)
I have to say, initially I really was completely convinced by Baltrušaitis’ interpretation of the painting. The perspective in the painting is so perfect that I assumed Holbein must have drafted the portrait using some method of direct projection. And if he did use some apparatus, like a grid with strings, then it would have been entirely straightforward for him to have made the anamorphic projection with same set-up, by simply guiding the strings to a second eye-point at a different spot in the room (though presumably at the same height as for viewing the main portrait).
So initially I saw my task as locating the painting’s vanishing point (x0, y0). My best guess, at that early stage, was that x0, the location of the central,vertical-axis of the painting, coincided with the rather conspicuous plumb-line.
Detail of The Ambassadors showing the plumb-line and eyelet which was my initial guess for the location of the painting’s vanishing point (x0, y0) = (1083.2, 1484.5). Image captured from Google Art Project, 26-may-2012.
The plumb-line is close-to, but somewhat to the right of horizontal center of the painting. My best measurement is that the plumb-line is located about 1083.2 mm to the right of painting’s leftmost edge (x0 = 1083.2). For the vanishing point’s vertical height, I chose the metal eyelet that confines the plumb-line. This choice also had the advantage that if Holbein were using strings, it would provide a convenient place to tie them. The vertical height of the eyelet is about 1484.5 mm from the bottom of the painting. Thus my best guess for the vanishing point of the portrait was, initially, (x0, y0) = (1083.2, 1484.5).
Now, it’s definitely not obvious, but it turns out the location of x0 is irrelevant. The main reason for this is that, as I discuss later in the video, the correct transformation to use for reconstructing the skull is the “Inverse Trapezoid” transformation, where x0 plays no role whatsoever. The “Inverse Trapezoid” transformation is an approximation to a true perspective transformation (of the sort effected by anamorphic.m). In this latter transformation, x0 does play a role, but its effect is negligible. This can be shown by actually moving x0 from the leftmost edge of the painting all the way to rightmost edge of the painting and measuring how little this alters the resulting transformation. Accordingly, there’s not much point in arguing whether the true center of the painting is the plumb-line, or the geometrical center, or some other point altogether. This is certainly not the case for y0, though, whose location has a large effect on how the image is transformed.
(3:13) “From this height, no matter what else you do, the skull is going to look, well, pretty lumpy.” In addition to a vanishing point (x0, y0), anamorphic.m still requires an angle and a distance. Equivalently, these two parameters can be determined by imposing two conditions on the transformation. As it turns out, I had assumed from the very beginning that (i.) the jaw-line should be horizontal and (ii.) the skull should be square. Solving for these conditions, given a vanishing point at (1083.2, 1484.5), yields that the viewer’s eye should be located a distance R = 2,786.4 mm away from (x0, y0) at an angle α = 7.58° from the wall. The resulting image is the “lumpy skull” shown in the video at (3:16). Being dissatisfied with the result, but wanting to keep (x0, y0), I tried varying the 2 additional conditions. For instance, I tried making the angle between the jaw-line and the floor’s edge 90°; I tried making the line across the eye-sockets horizontal. But in the end, as I stated, there’s really nothing one can do to change the fact that with y0 = 1484.5, the frontal bone of the skull (the forehead) is too squashed and the right eye-socket is just way too large in comparison to the left eye-socket.
(3:23) “I finally accepted that you get the best looking skulls when the eye is positioned about half-way up the painting…” Independent of the other ways in which the skull gets distorted, and independent of the distance and the angle of the eye from the painting, the eye’s height is very strongly correlated to the length of the skull’s forehead in proportion to the rest of the skull. If eye-level is too high, the forehead will look squashed and the skull will look like it fell-off the spine of a Neanderthal. If eye-level is too low, the forehead will look elongated and alien-like. That is why I am comfortable asserting that one may fix eye-level first, even though the other parameters (viz., distance and angle) are still unknown.
Methods of Projection (3:43-4:20)
(3:53) DÜRER, Albrecht. Illustration of a Drafting Technique Using Strings, woodcut, 1525. I’m not certain what the original context of this woodcut was, but it gets reprinted in several of Dürer’s published texts, including the Underweysung der messung, op. cit. supra, p. 88r. The Underweysung gets translated into Latin and broken-up into several, smaller books; I was able to find a higher-quality image in one of these, so the image used actually comes from:
DÜRER, Albrecht. Institutionum geometricarum libri quattuor, Johannes Jansonius, Arnhem, 1606, frontispiece. Digitized photographic reproduction of the complete text provided by Umeå University Library, Sweden.
(3:58) NICERON, Jean François. “Anamorphic Projection on to a wall”, La Perspective Curieuse, F. Langlois, Paris, 1652. Digitization of the complete text provided by Google Books. The image, which is printed as 2 halves, was stitched together and shaded by me using the GIMP. Note that this image is not present in the 1638 edition of the text.
The National Gallery in London’s Result (4:21-4:33)
In making the assertion that my analysis of the painting is superior to that of the National Gallery in London‘s, it would seem that the very least I could do is provide their result for comparison. Both the National Gallery and I present our optimal viewing locations in terms of millimeters to the right of the painting’s rightmost edge (Δx), millimeters above the painting’s bottom edge (Δy), and millimeters away from the wall (Δz). For comparison, here are the National Gallery’s numbers (labeled NG) and my numbers (labeled AB) listed side by side:
Δx: 790 mm (NG); 777 mm (AB)
Δy: 1040 mm (NG); 1035 mm (AB)
Δz: 120 mm (NG); 258 mm (AB)
See FOISTER et al., op. cit. supra, p. 53.
As you can see, our values for Δx and Δy are nearly the same, and if our discussion was limited to just these two numbers I would hardly claim our results were distinct. However, the fact that my value for Δz is over twice as large as theirs makes our answers substantively different.
Now the thrust of my analysis is based upon a reconstruction of Holbein’s putative trapezoid grid, as discussed later in the video. However, there are certain elements of the National Gallery’s numbers that we can call into question prima facie.
First, it’s rather odd form them to conclude that Δy is 1040 mm, which is a number with no particular significance, and not pick-up that only half a centimeter away is a point with a great deal of significance, namely the precise vertical midpoint of the painting, Ly/2 = 1035 mm. Altering Δy by 5 mm would have had a negligible effect on the appearance of their transformed skull but, at least according to me, it would have provided a very important clue to the original composition of the painting.
Second, and more importantly, the National Gallery’s value for Δz is almost impossibly small. 120 mm is only 4¾”, and it would be rather awkward to position your eye so close to the wall. My value for Δz, 258 mm = 10 5/32″, is a much more reasonable distance.
Thirdly, although I do not wish to reproduce an image from their book without permission, I maintain that my reconstruction of the skull simply looks better than their reconstruction of the skull. (Does this sound as childish to read as it does to say out loud?) Unfortunately, Foister et al. don’t provide much detail as to how they obtained there numbers beyond the following:
“A more sophisticated method used…a trapezoid grid to take account of the angle of viewing and achieve a more convincing resolution of the distortion in perspective. When Holbein’s elongated skull is subjected to manipulations on the computer imitating this process in reverse, the result is a perfectly drawn skull, the image with which he must have begun (Plate 54).“
FOISTER et al., op. cit. supra, p. 53.
As we speculated earlier, what most likely occurred is that the National Gallery employed one of many graphics programs that allows the user to perform a perspective-transformation by manipulating the position of the four corners of an image individually. Many programs will, additionally, output the resulting transformation-matrix. So, in this process, the user would manipulate the four corners of the image until the skull appeared reasonable and then record what the final transformation-matrix was. The distances of interest (Δx, Δy, Δz) could then be backed-out of the transformation-matrix by means of some straightforward math.
However, such a method can, at best, only provide a rough estimate of where the correct viewing location must be since, in practice, one can obtain decent-looking skulls from a fairly broad locus of viewpoints. Moreover, this method cannot provide any insight in to how Holbein would have painted the skull in the first place. Lastly we note that the reconstructed skull in Foister et al. (op. cit. supra, p. 52) shows the skull in the center of a vertically-symmetrical trapezoid. However, if the viewing-height is near the the midpoint of the painting (as both they and I agree), then that line must also be the center-line of the trapezoid grid and consequently the skull should be vertically offset towards the bottom. (See, for example, our image of the untransformed skull in its grid later in the video at 6:03).
Holbein’s Trapezoid Grid (4:34-5:21)
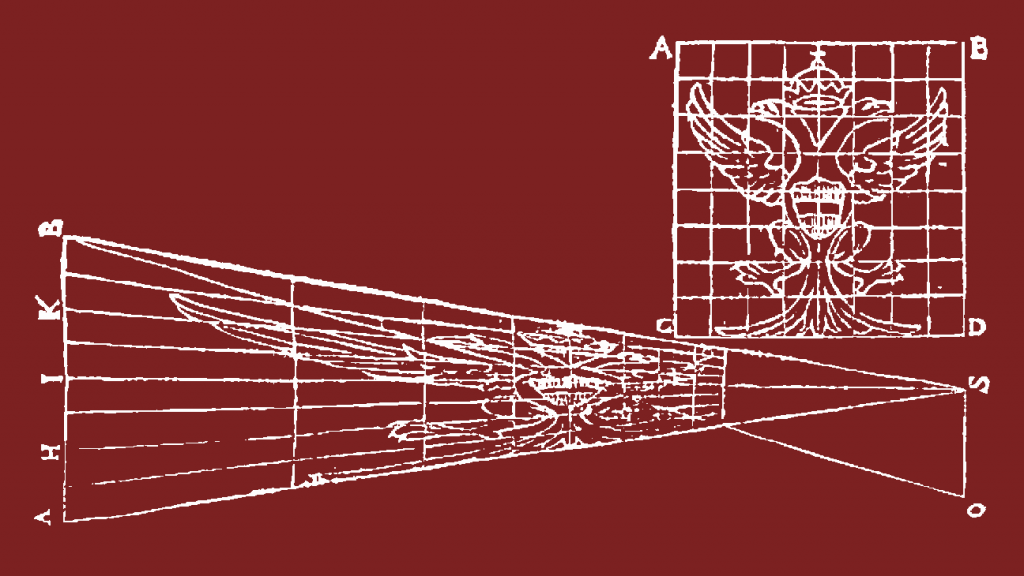
(4:34) NICERON, Jean François. “Trapezoid Grids for Anamorphic Projections”, La Perspective Curieuse, op. cit. supra, Plate 24.
(4:38) KIRCHER, Athanasius. Ars magna lucis et umbræ, Lodivico Grignano, Rome, 1646, frontispiece and title-page. Digitized photographic reproduction of the complete text is made available by the Herzog August Bibliothek, Wolfenbüttel, Germany.
(4:43) Ibid., p. 183.
(4:45) The same image, rendered in imperial Habsburg hues by AB. I’ve included it here, below, as a reference for what follows:
Here’s my translation of the text which accompanies this picture (KIRCHER, op. cit. supra, p. 183):
PROPOSITION VIII
For a given square, a grid, and an image located within it, draw the figure of an eagle (shown) in a different, optical quadrilateral, together with the grid, which will be unrecognizable unless the eye is placed at a given point.
Let ABCD be a geometrical square within which the eagle here inscribed is to be optically projected such that it cannot be seen except at a certain, given point. Operate as follows: Upon some flat wall, or also a horizontal surface, draw the line IS; at the endpoint I, draw at right angles another line AB, which is equal to one of the sides of the given square, such that the endpoints of line AB are equidistant from midpoint of line IS. Let this line AB be divided into the same number parts as the side of the square is divided. Then from points AHIKB, and the points in between, draw lines to S. Then let the distance of the eye be SO. And from O all the way to B draw a straight line, and where this line intersects lines AS, HS, IS, KS, and BS, draw from those same points lines parallel to AB. And so you will have a square divided optically on the wall, or horizontal plane, into which, according to the proportion of the squares corresponding to the geometrical square, you will inscribe also the figure of the eagle. If you draw this figure on a vertical plane, or some wall, then place your eye at O, on a stylus SO fixed perpendicularly to the wall, and the eagle will appear in its natural form just as in the square. In the same manner you will render optically any other shapes which, viewed from afar, will present nothing but a jumble, but with the eye positioned at O, will present their natural shapes. But these things are commonplaces. Note however: If the given shape is meant to be spread out on the floor, then the eagle in the geometric square ABCD should be drawn such that the body of the eagle, in square ABCD, rests perpendicular to the horizon-line. And, in accordance with this construction, the eagle should be drawn in the gridded triangle SBA. The figure of the eagle spread out in the horizontal plane will be seen from O, a point on a stylus SO that is placed upright and perpendicular to the horizon.
Note that Kircher refers to these sorts of transformations as ‘commonplaces’ (Sed hæc vulgaria). This comment (and I imagine one could readily track down others) supports my general feeling that the time-lag between The Ambassadors (1533) and treatises like Kircher’s Ars magna lucis et umbrae (1646) does not present any serious obstacle to the argument that Holbein was aware of, and used, this specific transformation. I presume that in 1533 Holbein would have been one of only a handful of master artists skilled in this technique and that it would have been regarded as something of a trade secret. But by the time Kircher and Niceron are writing, some hundred years later, the technique would have long since lost its cachet and been relegated to just a ‘vulgar’ optical illusion.
Digression: The Strange Case of John North
Of course, the reason why The Ambassadors has captured the imagination of so many people has little to do with the painting’s aesthetic merits (impressive as these are); no, The Ambassadors is famous because it is mysterious. What is the purpose of including such minute details on the astronomical instruments, in the two open books, in the patterns of the pavement tiles if not to conceal some secret message? Or at least that is the reflexive conclusion drawn by those who happen to be inclined to conspiracies. I was disappointed that time constraints did not permit me to mention anything about the painting’s objects in my video. It’s all the small details that make the painting so fascinating. On the other hand, I consider it a strong-point of my argument (on how the anamorphosis of the skull was executed) that it does not rely on any claims about the painting’s overall “meaning”. In this regard, if I may channel Newton, (what? I may? thank you!) “hypotheses non fingo…”
Now, I yield to no one in my passion for unravelling historical riddles. There’s clearly something going on in The Ambassadors. But, like with many such mysteries, we can divide our interpretations into ‘minimalist’ and ‘maximalist’ camps. Being something of a skeptical curmudgeon, I like to consider myself a minimalist’s minimalist. In the far opposite corner we may place the historian John North (†2008) and his book:
NORTH, John. The Ambassadors’ Secret: Holbein and the World of the Renaissance, Hambledon and London, London and New York, 2002.
I’m sort of at a loss as to what to say about the book. On the one hand, it provides the most sustained and in-depth technical discussion of the various objects in the painting that is to be found. On the other hand, it’s just plain bonkers. North develops an elaborate argument that somehow, by drawing lines and hexagrams and triangles and horoscopes (all related by the angle 27º), the painting hints at a secret meeting which occurred at a precise moment on Good Friday in London in 1533. But really every single assertion he makes in his long deduction is false. Again, the whole thing is nuts from beginning to end. But it’s sobering to realize that, superficially, his analysis and my analysis must look awfully similar. We both draw lines across the painting and compute angles, etc. Unfortunately, since we both rely on technical analyses, there’s no simple argument I can make to the casual reader as to why North is wrong but I’m right. No, reader, you’ll have to judge both of us on the merits.
Although I find nearly every element of North’s argument bewildering, I will single-out one element for comment since it touches upon my analysis–namely, the angle made by the skull. Before I really began analyzing The Ambassadors, and certainly before I had any particular theory in mind, I simply took it for granted that the jaw-line of the skull was suspiciously straight and that this was somehow an artifact of (and clue to) how it was transformed. And indeed, it turns out that my conclusion relies heavily on that supposition. If you don’t believe that the skull’s jaw-bone hints at an underlying geometric line, then you aren’t going to believe any of the rest of my argument either. Moreover, I simply assert that we can use the jaw-bone to trace-out a line, I don’t really demonstrate this in any way. In principle, I suppose I could pick out a bunch of points on the jaw-line and perform a χ-squared test to show linearity, but honestly that wouldn’t tell you anything your eye would not: either you see a line there or you don’t.
Well, curiously enough, North also sees a line in the skull, but a different line. North writes, “There is a very obvious axis to the distorted skull, however, and even by eye one may estimate its angle very accurately. Asked to regard the top-right section as part of an ellipse, an unprejudiced eye will put the axis of the ellipse within half a degree of 27 º.” NORTH, op. cit., p. 130.
First, I certainly don’t agree that it’s straightforward to ‘eye-ball’ an ‘axis’ for the skull. The skull is hardly an ellipse and depending on what points you decide to connect, the angle of your axis could vary by probably 10º or more. Of course North has an interest in choosing 27º since that value has a significance in the context of his larger argument. (Incidentally, the line I draw for the jawbone has an angle of 25.1º, but I don’t ascribe any special meaning to that number). But mainly I just find the whole thing depressing; I’m relying on the fact that if a viewer is going to hunt for lines in the painting, and in particular in the skull itself, he or she will agree with me that the most obvious candidate is the jawbone. But here we have at least one example of someone who doesn’t see things that way. And all of this just brings home the fact that as dispassionate and analytical as I tried to be, it’s just impossible to remove all subjectivity from a visual analysis of a painting. Sigh.
Equivalence of Kircher’s and My Trapezoid Grid
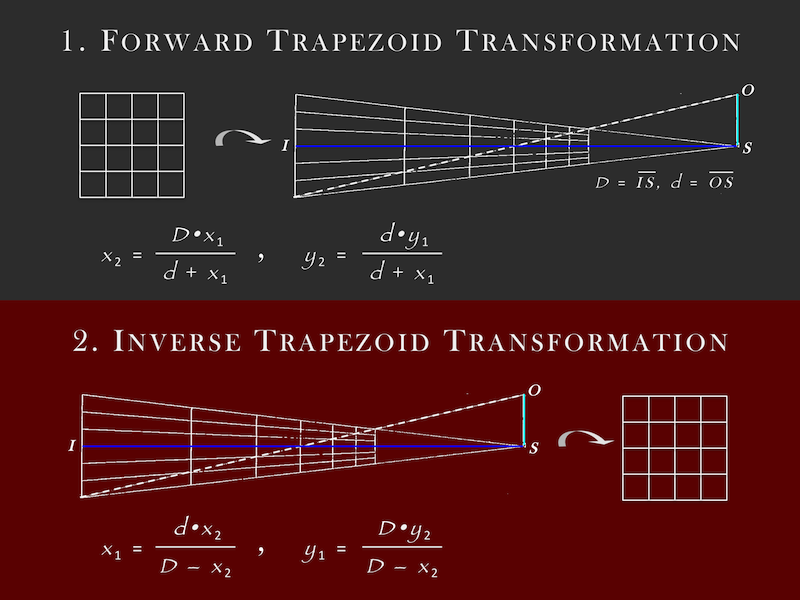
The astute viewer may rightly question whether the trapezoid grid I use in my analysis is indeed the same as those of Kircher and Niceron shown previously. The short answer is yes, the grids are the same. They appear different because Kircher’s grid takes the left-most vertical edge as a reference-line, whereas my treatment takes the central, vertical axis as a reference-line.
In essence, there is a unique vertical line that remains unchanged under a trapezoid transformation. In Kircher’s diagram, this line is the left-most edge of the image, and this choice ensures that the original and transformed images have the same overall height. My treatment of Holbein’s painting does not allow this, since the skull’s jawline intersects the leftmost edge significantly below the bottom of the painting. But in the context of the The Ambassadors, it is the central vertical axis that should remain unchanged in height if the viewer walks around the painting keeping a constant distance from the painting’s center point. (This was likewise the conceit we adopted for the perspective transformation effected by anamorphic.m.) Accordingly, it is more convenient to analyze the transformation with reference to this central, vertical line. Fundamentally, however, the choice of vertical reference-line serves only to set a magnification factor for the entire image; it in no way alters the underlying transformation. (Thus the choice of vertical reference-line is analogous to, and just as inconsequential as, the z-location of the screen in anamorphic.m).
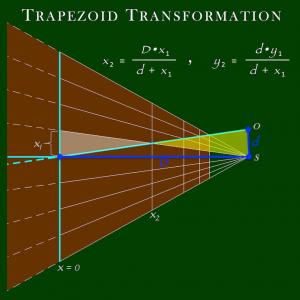 Somewhat more surprising is the fact that switching the vertical reference-line does not change the form of the transformation equations. The equations in the above diagram have the same form whether D is taken as the distance from point S to the central vertical-axis or from point S to the leftmost-edge. Deriving the transformation equations is straightforward once we realize that the two regions highlighted in the diagram are similar triangles, and that a unit displacement along the y-axis is equal to a unit displacement along the x-axis.
The Inverse Trapezoid Transformation (5:22-5:40)
Knowing the transformation equations for the forward trapezoid transformations, it’s a simple matter to find their inverses. The only subtlety is convincing yourself that the location of the vertical reference-line doesn’t matter. At issue, again, is whether the transformation in the green diagram, above, is identical to the transformation in the gray diagram, below. They are, and the skeptical reader is welcome to establish this fact for himself/herself.
(5:30-5:40) This animation is the output of the second computer code that I have posted here in full: inverseTrapezoid.m. Fundamentally, this code is the same as anamorphic.m but with the transformations given by the inverse trapezoid equations (red diagram, above).
The Skull Should Just Fit Inside A Perfect Square (5:41-6:02)
Fundamentally, a reconstruction of the anamorphic skull requires at least 3 parameters: a viewing height, a viewing angle, and a distance (or, equivalently, the xyz coordinates of the viewer’s eye). Of course, it’s possible to add more parameters; say, for example, if the viewer’s line of sight is not parallel to the horizon. But in the simplest case (which I believe also happens to be the correct case) 3 parameters are sufficient. Having set the viewing height earlier in our analysis, we are still left with 2 unknown parameters. We can find these by applying 2 conditions to the reconstructed skull and then solving for the unique set of parameters that satisfy both conditions simultaneously.
Much of my analysis derives from my hunch that the skull’s jawline is too straight not to be a clue of sorts to Holbein’s anamorphic technique. Accordingly, it was always likely that one of my two conditions would have something to do with the angle made by this line. I’m pleased that my original guess (namely, that the jawline of the reconstructed skull should be horizontal) proved viable. That is, we’ve taken the one really obvious angle in the painting and ensured that, when reconstructed, it takes on the only significant value possible–zero.
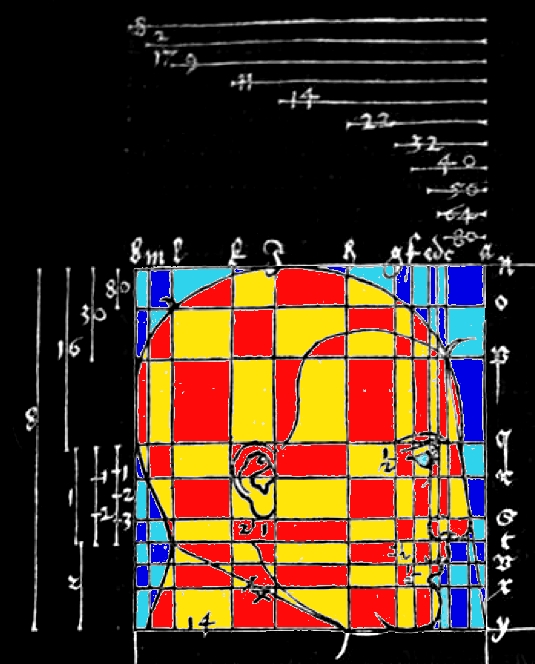
Using the skull’s aspect ratio seemed like a natural choice for the second, imposed condition. In general, it’s impossible to get a decent-looking skull when the aspect ratio is far removed from 1. So, again, it seemed reasonable to set this value to something significant and non-random–namely, 1. This condition was nothing more than a reasonable guess. Somehow I suspected, though, that if I looked I could probably find justification for the notion of a skull fitting inside of a perfect square, and finding a Dürer reference was like hitting the jackpot. Incidentally, I subsequently was able to track down a similar diagram by Leonardo da Vinci.
(5:41) DÜRER, Albrecht. De symmetria partium. Translated from German into Latin by Joachim Camerarius. In ædibus viduæ Durerianæ, Nuremberg, 1532, pp. 36, 49. Digitized photographic reproduction of the complete text provided by the Ruprecht-Karls-Universität Heidelberg. An earlier German edition of this text, Vier Bücher von menschicher Proportion (1528) can be found appended to his Unterweysung der Messung, op. cit. supra. But the Heidleberg text is nicer and, moreover, when given the choice between reading Latin in a terrifying fraktur font and German in a terrifying fraktur font, I’ll always choose the former.
(5:43) DÜRER, Albrecht. The same image, colorized by AB.
The Latin text (p. 36) which accompanies the image reads: Proposita igitur virilis capitis obliqua figura ex corporis totius longitudine partis 8 describes undique æquale quadrilaterum, id est quadratum. I’ve translated this roughly as: “For the figure of a male head, viewed from the side, draw a quadrilateral from the 8th part of the length of the whole body, equal on all sides, that is, a square.”
Holbein’s Actual Technique for Painting the Skull? (6:03-6:36)
BOXER, A. Simple geometric scheme illustrating the likely method used by Holbein to draft the anamorphic projection in The Ambassadors, march 2012.
To repeat, our basic argument is as follows:
1. By using an anamorphic technique that was likely known to Holbein, we can reconstruct the anamorphic skull subject to 2 independent parameters: the locations of points S and O. As part of this construction (and supported by considerations addressed earlier), the height of point S is fixed at the painting’s vertical midpoint.
2. By making two reasonable guesses about the appearance of the reconstructed skull, we can then solve for points S and O by finding the unique pair of points that satisfy our 2 imposed conditions simultaneously. The conditions we impose are (i.) the jawline of the reconstructed skull should be horizontal, and (ii.) the aspect ratio of the reconstructed skull should be 1.
3. Having located the positions of point S and O according to the reasoning above, we then see, a posteriori, that these 2 points fit into an extremely simple geometrical scheme: If the whole painting is divided into an 8×8 square grid, then point S will be located along the center line exactly 3 units to the right of the paintings edge, and point O will be located exactly one unit above point S.
4. The a posteriori confirmation of steps 1 and 2 by step 3 is so striking that it presents a very strong, albeit circumstantial, case that Holbein painted the anamorphic skull according to the system described in step 3 and illustrated in the diagram, above.
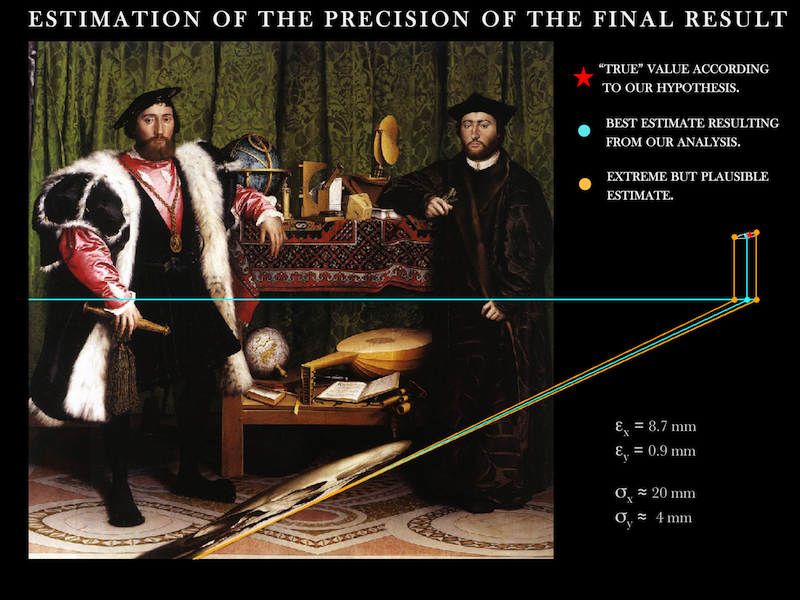
The visual confirmation provided by the above diagram is the most compelling piece of evidence for our argument. That is, the location of point O resulting from our analysis is so close to the location prescribed by our hypothesis that, in an image the size of the above diagram, the agreement appears to be exact. But how close are these points, really, and to what extent does their agreement impart a confidence to our larger claim? In the video (6:15) I state that the agreement is to within less than a millimeter; this is really only true for the y-coordinate, however, and I hope that my partial exaggeration–engendered by a slight excess of initial enthusiasm–will not be received by you, reader, entirely without charity. A more precise account of our errors is presented below:
____PREDICTED | RESULT | ERROR
O_x | 785.6 mm | 776.9 mm | 8.7 mm
O_y | 258.8 mm | 257.9 mm | 0.9 mm
Although our result is quite close to the predicted location, and the agreement of y-coordinates is downright impressive, fundamentally these numbers don’t tell us much in the absence of some sense of the uncertainties inherent in our analysis. The most direct approach to estimating these uncertainties is to determine how sensitive our results are to variations in the input parameters. And within the infinite family of conceivable sources of error, it seemed to me that the main offender was the location of point S, which is determined by finding the intersection of the painting’s center-line with the skull’s jawline.
In the above diagram, I drew what I considered to be the most extreme (but still plausible) lines tangent to the skull’s jawbone. In order to obtain a maximum spread in possible points S, these lines (shown in orange) actually cross over each other. That is, if we cover the skull’s jawbone, not with a line, but with a rectangle of some thickness, then the two orange lines are found by connecting the lower-right corner of the rectangle with the upper-left corner and vice-versa. The places where these orange lines intersect the painting’s center-line gives an extreme estimate of the spread in point S. Inputting these coordinates into our computer program inverseTrapezoid.m then provides us with a sense of the spread in the location of point O.
Because the resulting values aren’t a “random sampling”, but represent an intentionally extreme spread, it seemed reasonable to identify this spread with a 2σ deviation. Accordingly, if we follow the usual convention of citing a 1σ deviation as the uncertainty in our results, then this will be simply ¼ the total spread in either direction; that is,
σ_x = 20 mm
σ_y = 4 mm
With these values we can draw an “uncertainty ellipse” around point O to get a sense of the underlying precision of our result. Such an ellipse is too small to see in our diagram, however, so we drew an ellipse (white line) whose major and minor radii are instead given by 2σ. As we can see, our analysis allows us to pin-down the y-coordinate of point O more precisely than the x-coordinate.
So what does all this tell us? Well, in truth, all we can say is that since our errors are less than our uncertainties, our analysis provides us with no reason to reject our hypothesis as wrong. This isn’t, of course, to imply that therefore we must be right. At issue is the human tendency to “see” significance in everything. My analysis pointed me to an approximately 20 mm x 4 mm region outside the painting and, afterwards, I identified a point within this region that I claim is significant. Had my analysis led me to a different region, would I have come up with an entirely different rationale for why that region was significant? Possibly. One way to think about this is to imagine horizontal lines drawn across the painting at all the locations which someone might consider significant–say, for instance, the height of Jean de Dintville’s eyes, or the pole of the celestial globe. In other words, is it possible to obtain a viewing-point that lies on a line which is not significant? Ultimately, and inescapably, all our evidence is circumstantial. What is the likelihood (not mathematically, since this cannot be calculated, but viscerally) that all our various suppositions stand together simultaneously? What is the likelihood that if we make the jawbone straight and the skull a perfect square that we should then be able to account for the anamorphosis by a simple geometrical scheme? This, dear reader, I must leave to you to judge.
But The Painting Isn’t Square!
One aspect of our analysis that remains unsatisfying is the fact that The Ambassadors isn’t quite square. According to the conservators at the National Gallery (see WYLD, op. cit.) the painting measures 2095 mm x 2070 mm, that is, the dimensions are off by about 1%. This is puzzling since I reckon the painting was probably supposed to be square; otherwise why should the dimensions be as close as they are? As Wyld documents, the painting was painted on 10 vertical oak planks of varying widths and these planks have been subjected to all manner of warping, compression and water-damage over the centuries. So it’s possible the painting used to be square and is no longer. Or it’s possible that such imprecisions were expected to be rectified when framed. Or it’s possible that a 1% error was simply regarded as good-enough, although this seems surprising given the precision of Holbein’s draftsmanship.
In any event, this imperfection presents difficulties for my analysis since I have to decide how the painting should be gridded. The best results come when the painting is divided naturally into eighths, such that a unit distance in the x-direction is about 1% greater than a unit distance in the y-direction. That this method is the most natural and least artificial is satisfying, but it’s open to the criticism that the grid properly ought to be made of perfect squares. And since my own analysis likewise shows about at 1% uncertainty in determining x-coordinates, it seems impossible to address this criticism in the absence of additional information or insight. In my opinion, this is the principal weak-point of my hypothesis.
Exact Instructions For Viewing the Skull (6:37-7:09)
Here, for reference, is the slide from the video that lists our best estimate for where to stand in order to view the skull properly:
The curious reader, however, may wonder why any of this works at all. That is, what exactly is the connection between the trapezoid transformation and anamorphic projection? The answer is that the transformation-matrix used in the inverse-trapezoid transformation is actually a small-angle approximation to the transformation-matrix of a true anamorphic perspective transformation. This can be seen by looking at the transformation equations directly. Firstly, for the full perspective transformation, the equations were detailed in diagrams presented earlier, and these were then implemented in the MATLAB script anamorphic.m. For what follows, we will want to set the free parameter zscreen = -R. The equations then become:
PERSPECTIVE TRANSFORMATION
x’ = x•Rcosα / (R – x•sinα)
y’ = y•R / (R – x•sinα)
Meanwhile, the equations for the inverse trapezoid transformation (diagrammed earlier and incorporated into the MATLAB script inverseTrapezoid.m) are written as follows:
INVERSE-TRAPEZOID TRANSFORMATION
x’ = d•x / (D – x)
y’ = D•y / (D – x)
Following Kircher’s description of the trapezoid transformation, the parameters which we have named D and d ought to be equal to the base and height, respectively, of a right triangle whose hypotenuse is the line-of-sight connecting our eye to a pre-determined point on the image. Accordingly, our two transformations ought to be related by the following equations:
D = R•sinα
d = R•cosα
And, sure enough, it’s clear that inverse trapezoid equations approximate the true, perspective transformation in the limit α → π/2, sinα → 1. (Yes, I concede in retrospect that it would have been more elegant to define α as the angle between the line-of-sight and the wall and not the line-of-sight and the normal; nevertheless, I made that choice many months ago and it’s not worth it to go back and change everything. So, for those of you who care: you’re just going to have to deal with it).
At this point I had thought about displaying side-by-side images of the reconstructed skull, one being the output of anamorphic.m and the other the output of inverseTrapezoid.m, but the differences between the two images are so small as to be entirely indistinguishable (which is a good thing). However, the two methods do result in slightly different locations for the optimal viewing location. As one would expect, the location of point O resulting from anamorphic.m exhibits a (small) dependence on the choice of x0, the location of the central vertical axis. (Recall that this difficulty does not arise when using the inverse-trapezoid transformation). If we set x0 = Lx/2 then the discrepancies will be:
____inverseTrapezoid.m | anamorphic.m | Difference
O_x | 776.9 mm | 740.5 mm | 36.4 mm
O_y | 257.9 mm | 255.3 mm | 2.6 mm
The salient feature here, however, is not the extent to which these values agree or disagree, but rather that the comparison itself is irrelevant to our main argument. Our thesis is that Holbein used a geometric construction (and not a physical construction) to execute his anamorphosis; what the above table shows is how well/poorly that geometrical construction is able to approximate the true, physical situation. The table does not show how well/poorly our measurements compare with our hypothesis; those considerations were addressed earlier. On the whole, it’s actually quite remarkable how closely the trapezoid-method is able to approximate a series of calculations that would have been, for all practical intents, infeasible to someone in the 16th or 17th century. It makes one wonder how it happened that the trapezoid-method was devised in the first place? I find the whole thing kind of amazing, personally. Did it emerge from simple trial-and-error, or can it be traced back to some individual with a rather impressive grasp of trigonometry? A mystery, perhaps, for another time…
Idolmorphosis (7:10-8:32)
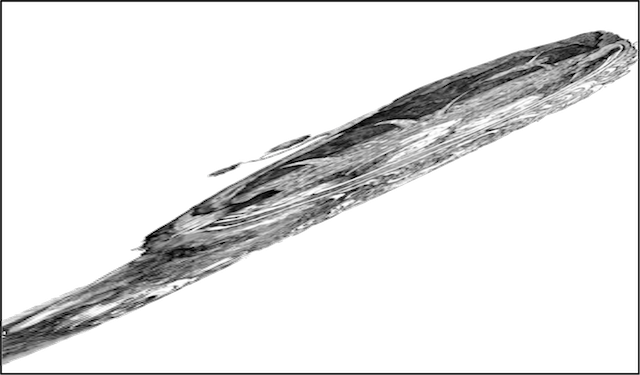
In order to make our very own Holbein-esque anamorphic projection, all we need to do is perform each of our operations in reverse. First we start with our final result–the distorted version of The Ambassadors containing the un-distorted skull. Here’s the entire painting transformed with inverseTrapezoid.m using the optimal parameters deduced by our analysis: y0 = Ly/2, x0 = Lx/2, D = 1824.45 mm, d = 257.88 mm:
BOXER, A. Inverse-trapezoid transformation of Holbein’s The Ambassadors showing the skull restored to its original form, march 2012.
Recall that, by construction, the restored skull must fit inside a perfect square. The dimensions of this square end up being 142 mm x 142 mm, and the center of the square has coordinates (21.65 mm, -783.00 mm).
Next we take a square image of our own choosing and assign to it coordinates such that the image will be located in an identical 142 x 142 mm box likewise centered at (21.65, -783.00). All that remains now is simply to perform the forward trapezoid transformation using the same values for d and D as before; the result will be an anamorphic projection of our image that is exactly the same size and shape, and located in exactly the same place as the skull in The Ambassadors. The code to do this will be identical to inverseTrapezoid.m except, of course, that the transformation matrix must be made from the equations for the forward, and not the inverse, trapezoid transformation.
(7:11) Naturally, there was never any question that if I was going to make my own anamorphic projection, it would be of our super amazing Idols of the Cave emblem. The eagle-eyed viewer, however, doubtless noticed that our emblem isn’t a perfect square. True indeed. So I took the liberty to squish it a bit, as may be revealed through fastidious staring…
(7:30) Printing the image to scale turned out to be surprisingly easy since, by my measurements, the lateral extent of the anamorphic skull in The Ambassadors is 915 mm which just so happens to be 36.0″ which just so happens to be a standard size of paper. So I took my image-file to the local print-shop and simply asked the friendly staff to print it out on 3-ft paper with zero margins. I can’t remember the price, but it was ridiculously cheap, I think something like 60 cents.
Holbein-esque anamorphic projection of our Idols of the Cave emblem.
(7:31-7:45) Fastening the image to the door of the shed took quite a bit of care in order to make sure everything was lined-up as accurately as possible. Hence the strange pieces of wood fastened to the door and the “shoe” and guides fastened to the wood. Although it got cropped-out of the video, the yardstick apparatus is actually a right-angle made-up of lengths d and D. That is the source of the “second” ruler that seems to appear out of nowhere at 7:43.
(8:12) Here I’m kicking away a strategically placed rock that prevented the door from closing past the correct viewing angle but, as a natural and inconvenient consequence, also prevented the door from closing.
(8:20) “I think we’ve made a pretty persuasive case.” I stand by that claim, although I’d also like to emphasize that I think it’s very important not to fall in love with one’s own hypotheses. All the more so in an enquiry like this which is inherently speculative. For all I know, some archivist somewhere could discover a handwritten letter from Holbein explaining that the “skull” was really just a horrible mistake made by one of his assistants who suffered from a terrible case of lazy-eye. And then we’d all look rather foolish wouldn’t we? So far be it from me to say that I actually believe Holbein painted the skull using the method I described. I don’t know if that’s true and neither do you. Nevertheless, I will state for the record that I find my explanation far more convincing than any other I’ve found, whether in books, articles, or the fever-swamps of the internet. Consequently, I hereby unilaterally declare my account of Holbein’s anamorphic technique to be the most authoritative until someone can convince me otherwise. OK upstarts, have at it!
Closing Music (8:10-8:41)
Following the example of episode #1 The Inaugural Stuffed Crocodile, we end this episode with a snippet from Michael Nyman’s “Drowning by Number 2”, from the soundtrack to Peter Greenaway’s film Drowning by Numbers.




Pingback: Falling in line (with perspective) | uniartclass
Pingback: manus – Meta-44